Water is both life-giving and destructive. Inside our homes, it serves us through countless daily rituals—morning showers, evening dishwashing, the comfort of a hot cup of tea. Yet when water escapes its intended pathways, it becomes one of the most insidious and damaging forces a homeowner will ever face. Unlike fire, which announces itself with flames and smoke, or theft, which leaves obvious evidence of intrusion, water damage often works in silence, hidden behind walls and beneath floors, slowly destroying your home’s structure while you remain completely unaware.
The cruel reality of water damage is that by the time it becomes obvious, the destruction has often been underway for weeks, months, or even years. That small water stain on your ceiling represents just the visible tip of a much larger problem lurking above. The musty smell in your basement isn’t just unpleasant—it’s a warning that mold is actively growing somewhere in your home. These subtle signs are your home’s way of crying out for help, and learning to recognize and interpret them can mean the difference between a simple repair and a renovation project costing tens of thousands of dollars.
This guide explores ten hidden signs of water damage that many homeowners overlook or misinterpret. More importantly, it explains what these signs really mean about what’s happening in your home’s hidden spaces, and why immediate action is not just recommended but essential.
1. Musty Odors That Won’t Go Away
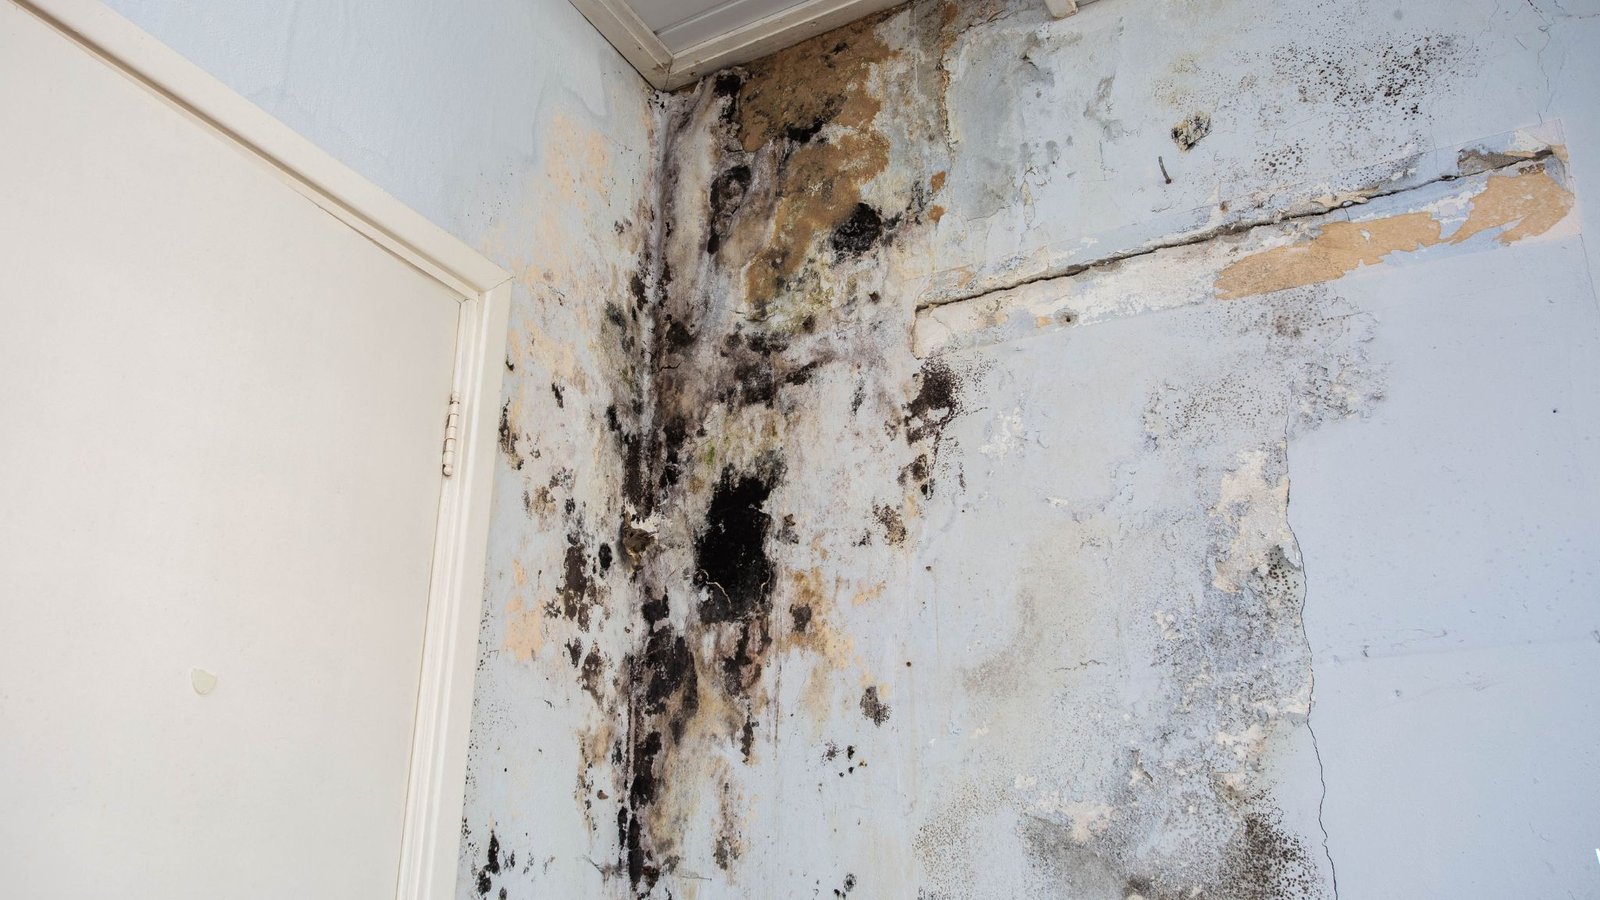
Walk into certain homes, and you’re immediately greeted by a distinctive smell—earthy, damp, almost like wet soil or rotting leaves. Many homeowners become so accustomed to this odor that they no longer notice it, or they attribute it to “old house smell” and accept it as normal. But that musty odor is anything but harmless.
What You’re Actually Smelling
That characteristic musty smell is the scent of microbial volatile organic compounds, or MVOCs. These are gases released by mold and mildew as they consume organic materials like wood, drywall, paper, and insulation. In other words, when you smell that musty odor, you’re literally smelling mold eating your home.
Mold requires three things to thrive: moisture, organic material to feed on, and the right temperature range. Your home provides the perfect environment—wood framing, paper-backed drywall, and temperatures typically between 60 and 80 degrees. The only variable is moisture, and if you’re smelling mold, that means moisture is present somewhere, even if you can’t see it.
The smell often intensifies on humid days or after running water nearby. You might notice it most strongly in bathrooms, basements, or near exterior walls. Sometimes the odor seems to move through your home, stronger in certain areas at different times of day as air currents carry those MVOCs through your ventilation system.
What It Really Means
A persistent musty odor indicates active water intrusion somewhere in your home. This could be a slow leak inside a wall, condensation accumulating in poorly ventilated spaces, groundwater seeping through foundation cracks, or moisture wicking up through concrete slabs. The mold producing that smell has already established colonies, meaning the moisture problem has existed long enough for spores to settle and grow.
Mold doesn’t just damage building materials—it poses serious health risks. Some people are highly sensitive to mold exposure, experiencing respiratory problems, allergic reactions, headaches, and fatigue. Certain mold species produce mycotoxins that can cause severe health effects even in people without mold allergies. Children, elderly individuals, and those with compromised immune systems are particularly vulnerable.
The hidden moisture feeding the mold growth is also rotting your home’s structure. Wood framing stays wet, gradually losing its strength. Drywall becomes soft and crumbly. Insulation becomes compressed and ineffective. Every day that the moisture problem continues, more damage accumulates behind your walls.
What You Should Do
Don’t mask the odor with air fresheners or accept it as normal. Investigate immediately to find the moisture source. Check the most common culprits first: under sinks for pipe leaks, around toilets for seal failures, in basements for foundation seepage, in attics for roof leaks, and around windows for condensation issues.
If you can’t identify an obvious source, hire a professional mold inspector who uses moisture meters and thermal imaging cameras to detect hidden water problems. Once you’ve found the source, fix it immediately and then address the mold remediation. Simply killing existing mold without eliminating the moisture source means it will return within weeks.
2. Peeling or Bubbling Paint and Wallpaper
You notice the paint on your bathroom ceiling starting to peel near the corner. Maybe there’s a small bubble in the wallpaper on an exterior wall, or the paint in your basement seems to be lifting away from the concrete. These seem like cosmetic issues—annoying, but hardly urgent. You might even consider them normal wear and tear, planning to repaint or re-wallpaper when you get around to it.
The Hidden Truth Behind Failing Paint
Paint and wallpaper are designed to adhere firmly to dry surfaces. When moisture gets behind these coverings, it breaks the adhesive bond, causing paint to peel, bubble, or crack, and wallpaper to lift and separate. This moisture intrusion means water is coming from somewhere it shouldn’t be.
In bathrooms, peeling paint often indicates inadequate ventilation combined with steam from showers penetrating the surface. On exterior walls, it might signal that rain is penetrating through deteriorated siding or failed window seals. In basements, bubbling paint on concrete walls typically means groundwater is pushing through the foundation, bringing moisture and dissolved salts that crystallize between the paint and the wall.
The pattern of paint failure tells a story. Paint peeling in ceiling corners near exterior walls often indicates roof leaks or ice dam damage. Paint bubbling in straight lines might follow the path of a leaking pipe inside the wall. Widespread paint failure across a large area suggests a systemic moisture problem like poor ventilation or foundation issues.
The Deeper Problem
When paint peels, the moisture that caused it hasn’t just damaged the paint—it has already saturated whatever material lies beneath. On drywall, this means the paper backing is wet and possibly moldy. On wood, it means the wood is absorbing moisture and beginning to rot. On concrete, it means water is actively moving through the foundation.
That moisture isn’t static. It’s continuously present, moving through building materials, carrying dissolved minerals, and creating perfect conditions for mold growth. The damage compounds daily as the wet materials deteriorate and microbial growth spreads.
Particularly concerning is paint failure on ceilings below bathrooms or behind appliances. These locations often indicate slow leaks that have been ongoing for extended periods, meaning significant hidden damage may exist above the ceiling or behind the wall.
Taking Action
When you notice paint peeling or bubbling, resist the temptation to simply scrape and repaint. This addresses the symptom while ignoring the disease. First, investigate why moisture is present. Feel the wall behind the failing paint—is it damp or cool to the touch? Look for nearby water sources like pipes, fixtures, or roofing.
Use a moisture meter to determine how deeply water has penetrated. If the area is actively wet, you must find and fix the water source before any repair. Painting over wet surfaces traps moisture inside, accelerating rot and mold growth while creating a perfect hidden environment for destruction to continue.
If moisture has penetrated drywall, you may need to remove sections to allow proper drying and to inspect the framing behind for rot or mold. This seems drastic, but it’s far less expensive than discovering advanced structural damage years later.
3. Warped or Buckled Flooring
Hardwood floors that have developed a slight wave, laminate planks that seem to have lifted at the seams, or tiles that sound hollow when you walk on them—these flooring changes often develop so gradually that you hardly notice them. You might think your floors are just aging, or perhaps the installation wasn’t perfect to begin with.
What’s Really Happening Beneath Your Feet
Flooring warps, buckles, and separates when exposed to moisture from below. Wood naturally expands when it absorbs water and contracts as it dries, but when moisture exposure is consistent, the expansion becomes permanent. The floor swells, and with nowhere to expand horizontally because it’s nailed or glued down, it has no choice but to buckle upward, creating those telltale waves and peaks.
Laminate and vinyl flooring respond similarly, though they typically separate at seams first, creating gaps or lifting edges. Tile floors might crack or develop hollow spots as the substrate beneath softens from water exposure, no longer supporting the rigid tile properly.
The moisture causing this damage comes from several possible sources. In ground-floor rooms, it might be rising through a concrete slab via capillary action, especially in homes without proper vapor barriers. In upper floors, it could be leaking from plumbing, particularly supply lines to bathrooms or drain pipes that leak slowly inside walls and under floors. In any location, appliances like dishwashers, refrigerators with ice makers, or washing machines might be slowly leaking.
The Serious Implications
Warped flooring is never just a flooring problem. The moisture causing it is also affecting the subfloor beneath. Wood subfloors exposed to continuous moisture rot, losing their structural integrity. They become soft, spongy, and eventually unsafe to walk on. Concrete subfloors subjected to rising moisture develop efflorescence, a white powdery substance that appears as mineral salts crystallize on the surface.
The dark, damp space beneath damaged flooring creates an ideal environment for mold growth. This mold is particularly concerning because it’s in an area with limited air circulation, allowing colonies to grow large before you ever become aware of them. The musty odors might not reach living spaces for months, meaning extensive contamination can develop undetected.
If the moisture source is a slow leak from plumbing, it’s not just affecting your floors. Water is also damaging joists, studs, and any insulation in its path. These hidden leaks can result in structural damage costing tens of thousands of dollars to repair properly.
Responding Appropriately
When flooring shows signs of water damage, immediate investigation is critical. Don’t wait to see if it gets worse—it will, and the longer you wait, the more expensive repairs become. Start by checking for obvious leaks around toilets, under sinks, behind appliances, and near water heaters.
If you can access the space below the floor—a basement or crawl space—inspect from underneath with a flashlight. Look for water stains on joists, dampness, mold growth, or dripping water. Feel the subfloor surfaces to detect moisture.
A moisture meter provides objective data about water content in flooring and subfloors. Readings above 16 percent in wood indicate a problem requiring immediate attention. Even if you identify and fix a leak, damaged flooring and subflooring may need replacement, as materials that have warped or molded typically cannot be restored to their original condition.
In some cases, addressing buckled floors requires removing the damaged flooring to allow proper drying, replacing wet insulation, treating mold, and potentially replacing rotted subfloor sections before new flooring can be installed. Yes, this is expensive and disruptive, but discovering advanced structural rot years later is far worse.
4. Unexplained Increases in Water Bills
Your water bill arrives, and it’s higher than usual—maybe 20 or 30 percent more than last month. You rack your brain trying to remember if you filled a pool, watered the lawn more, or had extra guests. Nothing obvious comes to mind, so you chalk it up to rate increases or water company errors and pay the bill without much thought.
The Hidden Leak You Can’t See
Sudden, unexplained increases in water usage almost always indicate a leak somewhere in your system. Unlike the dramatic gush of a burst pipe, these are often slow leaks that waste water continuously but subtly enough that you don’t notice puddles or obvious damage.
Running toilets are common culprits, silently allowing water to flow from the tank into the bowl 24 hours a day. A toilet that runs constantly can waste 200 gallons per day—that’s 6,000 gallons per month, or about 72,000 gallons annually. At typical water and sewer rates, this single leak could cost $500 or more per year in wasted water.
Underground leaks in service lines between your home and the water meter are particularly insidious. These leaks can waste thousands of gallons without producing any visible evidence inside your home. The water simply soaks into the ground, creating an expensive underground reservoir that does nothing but inflate your water bills.
Small leaks in supply lines to appliances, slow drips from faucets, or weeping from pipe joints all contribute to water waste that adds up quickly. Ten drips per minute equals about 350 gallons per year from a single faucet. Multiple small leaks combined can waste thousands of gallons monthly.
The Real Cost Beyond Your Bill
The wasted water itself is expensive, but it’s actually the least concerning aspect of these hidden leaks. Water escaping your plumbing system has to go somewhere, and that somewhere is into your home’s structure or the ground around your foundation.
Indoor leaks saturate building materials, creating all the problems discussed earlier: wood rot, mold growth, drywall damage, and structural deterioration. Even if you can’t see puddles, that missing water is somewhere, slowly destroying your home from the inside out.
Underground leaks erode soil around your foundation, potentially causing settlement, cracks, and structural instability. They keep the ground near your foundation saturated, which can lead to basement flooding, foundation failure, and ongoing moisture problems. The thousands of gallons leaking underground are literally washing away the stable soil that supports your home.
These hidden leaks waste not just water but your money in multiple ways: inflated utility bills month after month, structural damage accumulating unseen, potential mold remediation costs, and eventual repair bills when the damage finally becomes apparent.
Finding and Fixing Hidden Leaks
When your water bill increases without explanation, treat it as an early warning system alerting you to problems. Start by checking your water meter. Turn off all water-using appliances and fixtures in your home—every faucet, toilet, washing machine, dishwasher, and any other water-connected device. Then check your water meter. If the meter is still moving, water is flowing somewhere, confirming a leak.
Check toilets by adding food coloring to the tank. Wait 15 minutes without flushing. If color appears in the bowl, the flapper isn’t sealing properly, and you leak. Replace the flapper immediately—it costs just a few dollars and takes minutes.
Inspect visible plumbing throughout your home: under sinks, behind toilets, around water heaters, near washing machines, and under dishwashers. Look for moisture, water stains, or dripping. Listen for the sound of running water when everything should be off.
If you can’t find an obvious leak, hire a professional plumber. They have specialized equipment to detect hidden leaks, including acoustic listening devices that can hear water moving inside walls and ground-penetrating equipment that can locate underground leaks. The cost of professional leak detection is minimal compared to months or years of wasted water and accumulating damage.
5. Stains on Walls and Ceilings
You’re sitting in your living room when you notice a yellowish-brown stain on the ceiling that you don’t remember seeing before. Or perhaps there’s a discolored area on the wall behind your bed, slightly darker than the surrounding paint. These stains seem like they’ve appeared overnight, though you suspect they’ve been growing slowly and you simply haven’t noticed until now.
What Stains Reveal
Water stains on walls and ceilings are perhaps the most obvious signs of water intrusion, yet many homeowners underestimate their significance. That small stain is only showing you the visible portion of water that has already saturated materials behind your walls or above your ceiling.
The characteristic yellow or brown color comes from dissolved materials that the water carries as it moves through building materials. Tannins from wood, rust from metal components, and minerals from concrete all dissolve in water and create these telltale stains when the water evaporates, leaving those materials behind.
The stain’s location provides important clues about its source. Ceiling stains near exterior walls often indicate roof leaks or ice dam damage. Stains directly below bathrooms suggest plumbing leaks from tubs, showers, or supply lines. Stains on walls near windows might indicate leaking window seals or siding failures that allow rain to penetrate.
The Hidden Scale of the Problem
Here’s what most homeowners don’t understand: the stain you see represents only a small fraction of the water that has infiltrated your home. Water spreads laterally through insulation, along framing members, and across surfaces before finally soaking through drywall enough to create a visible stain. By the time you see that stain, the area of moisture damage behind the surface is typically 5 to 10 times larger than the visible mark.
A 12-inch ceiling stain might indicate that several square feet of insulation above is completely saturated, multiple joists or rafters are wet, and mold is growing throughout the affected area. Similarly, a wall stain the size of your hand could mean several feet of wall cavity is compromised by moisture.
The water creating these stains has been present long enough to dissolve and carry materials, meaning it’s been active for days, weeks, or longer. During this time, it has been continuously damaging everything it contacts: rotting wood, corroding metal, degrading insulation, and promoting mold growth.
Stains that grow or darken over time indicate ongoing water intrusion, not just a one-time event that has since dried. If a stain appears after rain, you have an exterior water intrusion point. If it appears or worsens after someone uses a bathroom above, you have a plumbing leak. If it’s always present and sometimes worsens, you might have a leak that varies with water usage patterns.
Proper Response to Water Stains
When you discover a water stain, immediate action is essential. First, try to determine if the area is actively wet. Carefully feel the stained area—is it damp or cool to the touch? Use a moisture meter if available to measure water content. Active moisture requires urgent attention to prevent ongoing damage.
Identify the water source by investigating logically. What’s above a ceiling stain? If it’s a bathroom, check all fixtures, supply lines, and drain pipes. If it’s an attic, inspect the roof for missing shingles, damaged flashing, or other entry points. For wall stains, examine nearby windows, exterior siding, and any pipes that run through the wall.
Don’t simply paint over stains. This is one of the most common and costly mistakes homeowners make. Paint doesn’t stop water, and covering stains without addressing their cause ensures that damage continues hidden behind fresh paint. You’re essentially covering up evidence of a crime while allowing the perpetrator to continue destroying your home.
Instead, fix the water source first, then allow the affected area to dry completely—this can take several weeks depending on conditions. Once dry, assess the damage. If drywall is stained but otherwise sound, you might clean and repaint it. If it’s soft, crumbly, or moldy, it must be removed and replaced. Always inspect the framing behind damaged surfaces for rot or mold that also requires remediation.
6. Cracked or Crumbling Grout and Caulk
In your shower, you notice some of the grout lines between tiles have developed small cracks. The caulk around your bathtub has separated slightly from the wall, creating a small gap. These seem like minor maintenance issues—purely cosmetic problems you can address whenever you get around to re-grouting or re-caulking.
Why These Small Gaps Matter
Grout and caulk serve critical waterproofing functions in wet areas of your home. They’re not just decorative lines between tiles; they’re seals preventing water from penetrating behind surface materials. When they crack or separate, they create highways allowing water to bypass your tile surface and infiltrate the walls and floors behind.
Grout cracks for several reasons: improper initial installation, structural movement in your home, or deterioration over time. Once cracked, water flows through these fissures every time you shower or bathe, accumulating behind the tile where it cannot evaporate or drain away.
Caulk separates as it ages and loses flexibility. The silicone or latex compounds harden over time, losing their ability to maintain a seal as surfaces expand and contract with temperature changes. Once that seal breaks, water finds its way through, just as it does through cracked grout.
The Damage You Don’t See
Behind your shower tile lies a moisture-resistant backing board or cement board, then wood or metal framing. While these materials are chosen for their water resistance, they’re not meant to be continuously wet. When water consistently flows through failed grout or caulk, it saturates the backing board, eventually reaching the framing behind.
Wet wood framing rots. Wet metal framing corrodes. The backing board, while resistant to moisture, eventually degrades when perpetually saturated. Mold grows prolifically in these consistently damp, dark spaces behind your tile, often covering entire wall cavities before you’re aware of any problem.
The moisture also travels downward, following gravity and capillary action. It soaks into the floor below your shower or tub, potentially rotting joists and subflooring. If your bathroom is on an upper floor, this moisture eventually appears as ceiling stains in the room below—but only after extensive hidden damage has already occurred.
Failed caulk around bathtubs is particularly problematic. Water flowing through these gaps runs down the outside of the tub, where it’s trapped between the tub and the surrounding structure. This creates a permanent reservoir of moisture that never fully dries, causing continuous damage to materials around and below the tub.
Prevention and Repair
Don’t wait for obvious water damage to appear before addressing failed grout and caulk. Instead, inspect these seals regularly as part of routine home maintenance. Look for any cracks in grout lines, gaps where caulk has pulled away from surfaces, or areas where caulk has hardened and become inflexible.
When you find problems, repair them immediately. Remove all damaged grout and replace it properly, ensuring full penetration into joints. Remove all old caulk completely—you cannot caulk over old caulk successfully—then apply fresh caulk in a continuous bead with no gaps.
For significant grout failure affecting many joints, consider having the shower professionally re-grouted. This might seem expensive, but it’s vastly cheaper than repairing water-damaged walls and floors once moisture has been leaking behind your tile for years.
In bathrooms with persistent grout cracking, investigate whether structural movement is causing the problem. Houses settle over time, and if your shower is experiencing excessive movement, simply re-grouting won’t solve the issue long-term. You may need to address the underlying structural problem.
Consider applying a grout sealer after repairs. Quality sealers make grout less permeable, providing an extra layer of protection against water intrusion. Reapply sealer annually or as recommended by the manufacturer.
7. Condensation on Windows and Pipes
Your windows develop moisture on the inside during the winter months, sometimes so much that water runs down the glass and pools on the sill. Pipes in your basement or crawl space “sweat” with droplets of water. These seem like natural occurrences—just condensation, nothing to worry about, right?
Understanding What Condensation Signals
While some minimal condensation might be normal, persistent or excessive condensation indicates problematic moisture levels in your home. Condensation occurs when warm, humid air contacts cold surfaces, causing water vapor to condense into liquid water. The more humid your indoor air, the more condensation appears.
Window condensation on interior surfaces suggests your home’s humidity levels are too high for the season and outside temperature. While you might attribute this to cooking, showering, or just having people in your home, persistent condensation suggests either inadequate ventilation or hidden moisture sources adding water vapor to your air.
Condensation on pipes occurs for similar reasons. Cold water pipes are below the dew point of your home’s air, causing moisture to condense on their surface. This is most common in humid environments like basements during the summer months when cold pipes are exposed to warm, humid air.
Why It’s More Than Just Inconvenience
Excessive humidity in your home promotes mold growth throughout your living spaces. Mold spores are always present in the air, but they only grow when they land on surfaces with adequate moisture. High humidity means every surface in your home becomes a potential growth medium for mold.
Water running down windows and pooling on sills causes wood rot in window frames and surrounding walls. This damage often goes unnoticed because it happens behind trim and inside wall cavities. By the time the window frames become visibly damaged, rot has typically spread extensively throughout the surrounding structure.
Condensation dripping off pipes creates puddles wherever it lands. In basements, this might be on concrete floors, which seems harmless, but the consistent moisture can still support mold growth on any organic materials nearby—cardboard boxes, wood furniture, paper goods. If pipes run through finished spaces, condensation can damage ceilings, walls, and flooring below.
High humidity affects more than just visible surfaces. It causes paint to peel, wallpaper to separate, doors to swell and stick, and hardwood floors to buckle. It makes your home feel uncomfortable despite adequate heating or cooling. It forces HVAC systems to work harder, increasing energy costs while reducing equipment lifespan.
Reducing Moisture and Condensation
Address condensation by reducing humidity levels and improving ventilation. Use exhaust fans in bathrooms during and after showers. Run kitchen exhaust fans while cooking. Consider installing a whole-house dehumidifier if humidity remains problematic despite these measures.
Ensure your clothes dryer vents properly to the outside, not into your home or garage. Check that bathroom fans actually exhaust to the exterior, not just into the attic, which is a surprisingly common installation error that causes attic moisture problems.
Improve insulation on windows where condensation is problematic. Storm windows or upgrading to double or triple-pane windows reduces the temperature differential that causes condensation. In the short term, keeping shades or curtains open allows air circulation across window surfaces, reducing condensation.
Insulate cold water pipes to prevent condensation. Pipe insulation is inexpensive and easy to install, creating a barrier between cold pipe surfaces and warm, humid air. This simple step can eliminate pipe condensation in most cases.
Investigate potential hidden moisture sources if you have persistent high humidity. Undetected plumbing leaks, foundation water intrusion, or crawl space moisture can all contribute substantial water vapor to your indoor air. A moisture meter or professional inspection can identify these hidden problems.
8. Cracks in Foundation or Basement Walls
While inspecting your basement, you notice a hairline crack running vertically up the concrete wall. Or perhaps there’s a horizontal crack with a slight offset where one side protrudes slightly from the other. These cracks might have been there when you bought the house, or they appeared gradually enough that you’re not sure when they formed.
What Foundation Cracks Indicate
Not all foundation cracks signal water problems, but many do, and even those that don’t can create pathways for water intrusion. Foundations crack for various reasons: curing shrinkage in concrete, settlement as soil compacts beneath the foundation, frost heave in cold climates, or pressure from soil and water against foundation walls.
Vertical cracks are often the least concerning structurally, typically resulting from normal curing and settlement. However, they still provide entry points for water. Horizontal cracks suggest serious pressure against the foundation wall, often from saturated soil pressing inward. These are structurally significant and require professional evaluation.
Diagonal cracks running at angles suggest differential settlement, where one part of your foundation is settling more than another. Step cracks in block foundations follow the mortar joints in a stair-step pattern, also indicating settlement or pressure issues.
The Water Connection
Whether cracks cause water problems or result from them, they create ongoing concerns. Water in soil around your foundation exerts tremendous pressure, especially when that soil freezes and expands in winter. This pressure forces water through any available opening, including foundation cracks.
Once water penetrates your foundation, it creates multiple problems. It appears as dampness or puddles in your basement, obviously, but it also raises humidity throughout your lower level, promoting mold growth on everything stored there. Over time, the moisture wicks up through walls, affecting even upper levels of your home.
Water entering through foundation cracks brings dissolved minerals, often visible as white crystalline deposits called efflorescence on basement walls. While efflorescence itself isn’t harmful, it’s evidence of ongoing water movement through your foundation.
The cycle becomes self-perpetuating: water enters through small cracks, freezes during winter, expands and widens the cracks, allowing more water entry during the next thaw. Each year, cracks grow larger, and water intrusion worsens.
Addressing Foundation Cracks Properly
Small, stable cracks in poured concrete foundations can often be sealed from the interior using hydraulic cement or epoxy injection systems. These repairs prevent water intrusion but don’t address underlying structural issues if they exist.
For significant cracks, especially horizontal or stepped cracks in block foundations, professional structural evaluation is essential. These might require exterior waterproofing, installation of drainage systems, or even foundation reinforcement to prevent further movement.
Exterior waterproofing, while expensive and disruptive, provides the most effective long-term solution for foundation water problems. This involves excavating around your foundation, applying waterproof coatings and membranes, and installing drainage systems to direct water away from the foundation.
Interior drainage systems like French drains with sump pumps can manage water that enters through foundations without the expense of exterior excavation. These systems collect water at the foundation’s base and pump it away before it can flood your basement.
Beyond crack repair, address the moisture source causing pressure against your foundation. Ensure gutters and downspouts direct water well away from your home. Grade the soil to slope away from the foundation. Consider installing drainage systems if your property has chronic water accumulation near the foundation.
9. Rust Stains Under Appliances
You pull your washing machine away from the wall to retrieve a dropped sock and notice rust stains on the floor beneath it. Or perhaps you spot rust marks under your refrigerator or water heater. These stains seem incidental—just metal meeting moisture in expected ways.
What Rust Reveals
Rust stains under appliances indicate that water has been present long enough and frequently enough for oxidation to occur. This isn’t a one-time spill that was cleaned up; it’s evidence of repeated or chronic water exposure.
Under the washing machines, rust suggests supply hose leaks, drain hose leaks, or tub seal failures that allow water to escape during the wash cycle. These leaks might be small—just a few drops per load—but those drops add up over hundreds of wash cycles, creating the persistent moisture necessary for rust formation.
Under refrigerators with ice makers or water dispensers, rust indicates supply line leaks or condensation drip pan overflows. The supply line that runs to your fridge is under constant pressure and can develop pinhole leaks at connections or anywhere the line has been damaged or kinked.
Under water heaters, rust stains often indicate that the tank itself is beginning to fail. Water heater tanks rust from the inside out as the protective anode rod depletes and corrosion begins attacking the steel tank. Small leaks develop, drip onto the floor, and create rust stains before the tank fails.
The Progression of Damage
The rust you see isn’t just discoloring your floor—it’s evidence that metal components are corroding, growing weaker with each passing day. A washing machine hose with a small leak today might burst catastrophically tomorrow, releasing dozens of gallons before you can shut off the water supply.
The water creating rust stains is also affecting the flooring and subflooring. If you see rust on a wood floor, that wood is damaged and may need replacement. If rust appears on vinyl or laminate flooring, water has been present underneath, potentially rotting the subfloor below.
Water heater leaks are particularly concerning because they indicate imminent tank failure. A water heater holding 40 to 80 gallons can flood your entire home when the tank ruptures. If you’re seeing rust stains beneath your water heater, you’re in the warning period before catastrophic failure.
Immediate Action Required
When you discover rust stains under appliances, investigate immediately to identify the water source. For washing machines, inspect supply hoses for bulges, cracks, or weeping at connections. Check drain hoses for cracks or loose connections. Run a test cycle while watching for leaks.
For refrigerators, inspect the water supply line along its entire length, from the wall connection to where it enters the fridge. Check for kinks, cracks, or moisture at fittings. Inspect the drip pan under the refrigerator; if it’s overflowing, condensate drainage might be blocked.
For water heaters, any rust stains or moisture around the tank means replacement is imminent. Don’t wait for complete failure. Begin planning water heater replacement within weeks, not months, as catastrophic tank failures can occur at any time once corrosion has progressed enough to allow leaking.
Replace washing machine hoses proactively every five years, or immediately if you notice any deterioration. Consider upgrading to braided stainless steel hoses that are far less likely to burst than standard rubber hoses.
Install appliance leak detectors—small sensors that sound alarms when water is detected. These provide early warning of leaks before significant damage occurs, especially useful in locations you don’t regularly inspect, like behind washing machines or under water heaters.
10. Discolored or Murky Water
You turn on your tap and notice the water looks slightly cloudy, or perhaps there’s a yellow or brownish tint. Maybe the water appears clear at first, but it becomes cloudy if you let it run. While this isn’t exactly a sign of water damage in your home, it indicates plumbing problems that can lead to leaks and water intrusion if not addressed.
What Discolored Water Means
Water discoloration comes from various sources, each indicating different problems. Cloudy or milky water often contains tiny air bubbles, usually harmless but sometimes indicating pressure irregularities in your plumbing. Yellow or brown water typically contains dissolved iron or rust from corroding pipes. Black or gray water might contain manganese or, more concerning, decomposing organic matter from compromised pipes.
Rust-colored water indicates your pipes are corroding from the inside. This occurs primarily in galvanized steel pipes common in homes built before 1960. As these pipes age, rust accumulates inside, eventually breaking free and coloring your water. Each time you see rusty water, you’re witnessing your pipes deteriorating in real time.
The timing and pattern of discoloration provide clues. If only hot water is discolored, your water heater likely has sediment buildup or internal corrosion. If cold water is also affected, the problem is in your main supply pipes. If discoloration occurs only after water sits unused for hours, rust is settling in pipes and then being stirred up when you resume water flow.
The Bigger Picture
Corroded pipes that discolor your water are weak pipes approaching failure. The rust you see in your water represents metal that’s no longer part of your pipe walls. As corrosion continues, pipes develop pinhole leaks, then larger leaks, and eventually burst, causing sudden flooding and water damage.
Beyond the leak risk, severely corroded pipes reduce water pressure as rust buildup narrows the interior diameter. They contaminate your water with metals that can pose health risks, particularly for lead pipes or fixtures where corrosion can leach lead into drinking water.
The corrosion process is progressive and irreversible. Once your pipes have deteriorated enough to discolor your water, they’re near the end of their functional lifespan. You’re in a countdown to failure, and the question isn’t if leaks will develop, but when.
Taking Preventive Action
If you notice discolored water, have your water tested for metals, including lead, iron, and other contaminants. This provides crucial information about what’s in your water and whether it poses health risks.
Flush your system thoroughly by running cold water taps for several minutes. If discoloration clears, the problem might be localized to a section of pipe or recently disturbed sediment. If it persists, you have more serious corrosion issues.
Have a plumber inspect your plumbing system, especially if your home is over 40 years old. Video camera inspections can reveal the interior condition of pipes without invasive opening of walls. If corrosion is advanced, consider proactive pipe replacement before leaks develop.
For water heater sediment issues causing hot water discoloration, drain and flush the tank. If this doesn’t resolve the discoloration, the tank’s anode rod might be depleted, and the tank itself is corroding, indicating replacement is needed soon.
Install whole-house water filters if your water has high mineral content. While this won’t reverse existing corrosion, it can slow its progression by reducing the corrosive compounds flowing through your pipes.
Conclusion: Your Home Is Talking—Are You Listening?
These ten signs represent your home’s vocabulary for communicating distress. Like a patient unable to speak, your home shows symptoms that, when properly interpreted, reveal serious underlying conditions. The musty odor isn’t just unpleasant—it’s your home telling you mold is consuming its structure. The small water stain isn’t merely cosmetic—it’s a cry for help about ongoing water intrusion destroying hidden spaces.
The cruel irony of water damage is that it punishes delay mercilessly while rewarding quick action generously. Address a small leak today, and you might spend $100 on a simple repair. Ignore it for six months, and that same problem could cost $10,000 to properly remediate the resulting rot, mold, and structural damage. The difference between a minor inconvenience and a major catastrophe often comes down to whether you recognized the warning signs and acted promptly.
This is why developing what might be called “home awareness” is so valuable. Walk through your home regularly with observant eyes and an inquiring nose. Notice changes in how things look, smell, sound, and feel. That slight dampness on a wall, that new stain on a ceiling, that musty smell that wasn’t there last month—these aren’t details to dismiss but clues to investigate.
Create a simple home inspection routine. Once a month, walk through every room, open cabinets under sinks, check behind appliances, inspect attics and basements, and look for any of the signs discussed in this guide. Use your senses: look for stains and warping, smell for mustiness, feel for dampness, and listen for dripping or running water.
When you find problems, resist the temptation to minimize their significance or delay addressing them. That moment of discovery is your opportunity to prevent a disaster, not start a countdown to one. Call a plumber, hire an inspector, or take whatever action is appropriate for the specific issue, but do it quickly while the problem is still manageable.
Understand that water damage is not like other home maintenance issues. A squeaky door is annoying, but it won’t get worse if you ignore it for a year. A patch of peeling exterior paint is unsightly but won’t compromise your home’s structure. But water damage is different—it’s progressive, accelerating, and compounding. Every day you delay makes the problem worse, the damage more extensive, and the eventual repair more expensive.
Also recognize that water problems often have cascading effects. A small leak doesn’t just waste water and damage the immediate area—it raises humidity throughout your home, promotes mold growth in multiple locations, attracts insects that thrive in moist conditions, and can eventually affect electrical systems as moisture reaches wiring. One small problem multiplies into many interconnected issues.
The financial dimension cannot be ignored. The typical homeowner will spend $10,000 to $20,000 on water damage repair at some point during homeownership, with many spending far more. Most of this expense is avoidable through early detection and prompt repair of small problems before they become catastrophes. The few hundred dollars spent fixing minor issues is among the best investments you can make in your home.
But beyond finances, consider the disruption and stress that serious water damage creates. Living through major water damage restoration is miserable. Your home becomes a construction zone for weeks or months. You might need to relocate temporarily. Treasured belongings get destroyed. The smell of mold and drying materials permeates everything. The noise of fans and dehumidifiers runs constantly. The parade of contractors, adjusters, and inspectors disrupts your privacy and routine.
All of this is preventable. Every catastrophic water damage situation I’ve described began with warning signs that went unnoticed or unaddressed. Someone saw the small leak but decided it could wait. Someone noticed the musty smell but thought it was just “normal.” Someone found the water stain but painted over it instead of investigating.
Don’t be that person. Be the homeowner who understands that small signs mean big problems lurking beneath the surface. Be vigilant, be proactive, and be willing to invest time and money in addressing issues promptly. Your home is one of your most valuable assets and the place where your family lives—it deserves your attention and care.
Learn to read the signs your home is showing you. When you notice any of these ten indicators of water damage, treat them as urgent matters requiring immediate attention. Investigate thoroughly, hire professionals when needed, and fix problems completely rather than applying temporary patches.
Remember that your home’s structure is only as strong as its driest component. Water is the universal solvent, capable of destroying every material in your home given enough time. Wood rots, metal corrodes, concrete crumbles, drywall dissolves—all from water exposure. Your job as a homeowner is to keep water where it belongs: in pipes, drains, and fixtures, flowing predictably and controllably, never escaping to damage the structure that shelters you.
The ten signs discussed in this guide are your early warning system. Heed these warnings, and you’ll save yourself from the nightmare of serious water damage. Ignore them, and you’re gambling with your home’s structural integrity, your family’s health, and your financial security. The choice is yours, but now you know what to look for and why it matters. Your home is talking—make sure you’re listening.